Sunday, June 30, 2013

More of May

Hello people of the world. I am back again with some more Smashbook pages. I'm going to endeavor to keep it short and simple, since I'm fairly certain I do way too much blathering. There is no theme today, these are just more of my May pages that I never got around to posting. I just finished up my June ones this afternoon, so there will be some fresh pages up soon. Hopefully. I seem to be rather terrible at updating on a regular basis. Oh well.

   
My favorite part of this page (aside from the lovely picture of my handsome young man) is that WTF card! I ran across these on the internet one day and cheated and printed a couple. This was my last one, so I will soon be scouring the interwebs for it once again. (If you know where I can find them, please comment with the link!) I also heart the little "we've got class" tag; it's cut out from a sheet of paper with all kinds of adorable vintage-y school images. Old school stuff is pretty much my favorite. Not like "old school," but like classroom things from the 50's. You know what I mean.


 Yeah, so I doodled a picture of a creepy old guy and put it in my Smashbook, what? He looks like Vernon Dursley and I like him. I think Molly's picture is probably better than mine, but whatever. My Smashbook is a record of my life, weird subpar doodles and all.

I got some new stamps, so that's pretty fun.

I finished another Smashbook! They seem to be lasting less and less time the more I get into it. It always feels like such an accomplishment to finish a whole Smashbook, so I can never resist adorning the last page with a few pretty things and a little note.


I had a lot of Mother's day goodies, so I added a pocket and stuck them in there. I loved the gorgeous card from my hubby and wanted to put pictures of me with the kids on there, so there wasn't much room for the thousands of things I had to say about Mother's Day. I did my journaling on some pretty paper and put it in the pocket with the cards my munchkins made me and a picture I liked but wouldn't fit. And those adorable little flag clippies, which found themselves on the first page I made after buying them. Aren't those silhouettes of the kids precious? Now that they're made, I have the feeling they're going to be showing up in lots of places around the house!

 I showed this Sookie page in my last post, but here is it's mate.

 
My kids draw cute things and I made a page about it. That red polka dot washi tape looks pretty good on the blue paper, don't you think? I couldn't resist drawing a few art supplies to add to the page, but I think they turned out pretty cute. We're such a crafty family, lol.


 And, just to show that not every page is a masterpiece, here's one that just got cobbled together with all the rest of the junk from May.


Well, I hope you enjoyed taking a peek inside my Smashbook. It's been so miserable and yucky here lately that I haven't been taking as many pictures or feeling as inspired lately. Plus, I checked out The Forsyte Saga from the library, so that's like 12+ hours of loveliness taking my attention. It's nice to share pages, since it always makes me want to go create more! Comments would be lovely, and might even encourage me to post more often. Just sayin'.

Tuesday, June 11, 2013

My Craft Room

Hey friends! I'm amazingly adding another post and it didn't even take me four weeks! Woo-hoo! Today I thought I'd show you a few quick pictures of my craft room. 

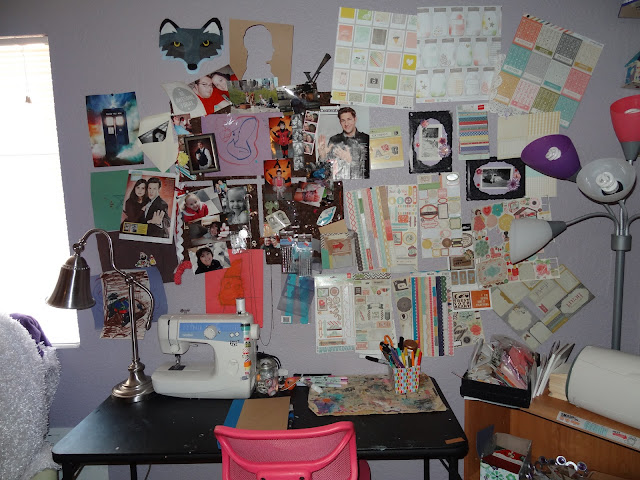
Now, you may be asking yourself, 'Why on Earth would she want to share that chaotic, messy space she calls a craft room with the internet?' Well, you're in luck because I'm going to tell you! I've seen lots of pictures on the internet of perfectly organized and color-coordinated craft rooms with custom tables in the center and extensive cubbies with wicker and cloth baskets where everything is put away and looks beautiful. But you rarely see pictures of realistic craft spaces where real people do the real dirty work of making things. Hence, me sharing mine. While my craft room may be chaotic, it's an organized chaos. I know exactly where every little thing belongs and where it can be found when I need it. Besides, I am a firm believer that creative spaces need to be a little messy.

This is my main workspace. I have a corner with two desks and a bookshelf where I do almost all of my creating. It took a while to get this configuration right, but now it works pretty well for me.


I use a cheapy folding table that I hope to replace one day soon with one that doesn't rock insanely every time I use my sewing machine. Hopefully with a thrift store bargain, since it with invariably get covered in paint. The wall behind my desk has cork board squares on it, but as you can see, they covered nowhere near enough space, so I just started pinning things straight to the wall. Eventually, the cork board ended up being where I keep things I love to look at- pictures of my favorite people (including John Krasinski and the Doctor), my kids' drawings, an old fork I found at my Grandpa's house, and always pretty paper. That and a place where my old earrings go when I lose their mates. I like to have my sheets of stickers and doo-dads right in front of me so I remember what I've got. The black box next to the Cricut is also filled with that kind of stuff- paint chips, journaling squares, library cards, all the accoutrement I use in my Smashbook. 

I keep a blotter handy for when I stamp or need to practice writing or doodling something. My desk also holds a container of my favorite pens, markers and glue, as well as a vintage mason jar of washi tapes. The wooden desk serves as a spill over area, where I keep my materials when I'm working, and where my husband dumps all the random detritus he collects from around the house that he knows I'll want to keep. The baskets on top hold more Smashbook products- pockets, tabs, tags and more of the ephemera that I so love to collect. The bookshelf in between the desks holds my paper cutter and other supplies I need close at hand, as well as my Cricut mats and paper.


 The wall on this side works even harder than the other one! I have always dreamed of owning a ribbon holder since the days of shopping at Jutenhoops when I was a tween, and last year my aunt gave me this one for Christmas. I was so delighted that I cried! The first thing I did was to sort all of the ribbon by color and size, and now it proudly sits, beautifying my space and ready to offer a bit of ribbon or rick rack whenever I need it. I also have a shelf full of paints, which also used to be color organized before my paint buying got out of hand. And of course, there is my peg board wall, which may be smallish, but goes a long way towards organizing and keeping in sight all of my goodies.


I bought the peg-board from Michaels, so they're smaller squares instead of one large piece. I did that mostly because at the time, I hadn't discovered Pinterest, and didn't know you could paint the wood ones from the hardware store. The best part about the smaller pieces is that I can add more when I need more storage. The baskets are thrifted, and the paint one is actually for a shower. I love my pegboard for storing and showcasing my washi tape collection. I also used baby food jars and tiny wedding favor buckets from the dollar store to hold brads and buttons and gems, as well as paper flowers and extra bits of trim. My bakers twine resides on an extra dowel from my ribbon holder that I just rested on two hooks. The bar and basket on the bottom were bargains from Ikea. The whole peg board system here cost me less than $40.

So that's my crafting space! If you noticed that I didn't include two of the walls in the room, it's because those go from lived in messy to disastrous messy. It's mostly all bookshelves anyway, except for my little old lady green recliner in the corner for reading and my kids' craft table. My craft room is my favorite room in the house; it's the room I escape to when I just want to be me for a while and let my hands work and my mind turn off. Thanks for taking a little tour with me. Feel free to comment on how messy it is, or how awesome. I'd love to hear from you!

Thursday, June 6, 2013

Flip-Flapper

Today I'm sharing some of my Smashbook pages that all have a common element: they feature flaps! I've recently come to really love this little interactive element because it allows me to include three or four times as many pictures as I would otherwise be able to have, and because it makes my Smashbook just that much more fun to look through. 

On this first page, I wanted to highlight my daughter's graduation from her Sprouts class, but I also wanted to sort of conclude the Awanas for the year for both kids. Her accomplishment was the more important one, so that picture made the front flap. 

When you flip the little tab, you can see the comparison picture underneath. I like to use the back of the top flap as extra scrapping space. Here I added a little paper tag and a bit of journaling. I almost always have something to say about every picture I put in, so that little bit of extra space for notes or stickers or whatever helps. You could add another photo to the back of the top one to really maximize the number of pictures you can get in the space. 

Generally, I make my flaps using washi tape. It works pretty well to secure the flap while still allowing for movement. I use a strip on top of the flap, just as if I was securing it to the page regularly. Then, I flip it over and add another strip to the underside where the first strip is on the front. You can use a fingernail or a bone folder to gently crease it on both sides, just to help it move a little easier. Just be careful not to tear your tape! I prefer to use the same tape for both sides, but you could switch it up if you were so inclined.
 
After laying my flaps down and taping them, I like to add a tab to make turning them easier and to show that there is more to see.
I make my tabs with this awesome punch from Fiskars. On my sister's graduation page to the right, I used a little bit of the scrap paper I had left over from making the banner for her party. Sometimes I tape them down with washi tape, but more frequently, I just staple them. It's easier and stays better through handling. There's extra interactivity in this page too, since you can pull her graduation announcement, party invitation and senior picture out of the envelope. The whole point of Smashbook, for me at least, is to have a place to keep that kind of precious memorabilia on hand. In a pretty way.


On this page, the flap situation is a little different. As we've previously established, I'm a bit of a nerd and like to document everything I read. With the final Sookie Stackhouse book having been recently released, I decided to re-read them all in preparation for the very last new Sookie story. And, since there are thirteen of them, I wanted to have a little cheat sheet for what happens in each book.

I used some old Rolodex cards that I found at the thrift store for a dollar. They were nicely aged and yellowed, but I did define the edges a little bit more with a yellow marker. And then I filled up all the pages with my untidy ramblings and brief plot outlines. So, if you haven't read the books, don't read my notes because they're full of spoilers.

On a related note, Dead Ever After was... better than I expected, but just kind of okay. Charlaine Harris bizarrely decided to narrate from other characters perspectives for the first time in the whole series, which gave away a lot of the mystery, not to mention detracted from the last of our time with Sookie. My speculations for the final outcome were mostly correct, but not the way I expected. It also felt mildly unfinished, so I'm thankful for the news that there is a "what happened next" book scheduled for the fall. I've been a fan of the Southern Vampire series for a long time, and I'm sad to see the conclusion. True Blood starts back in a couple of weeks, but last season was so atrocious (and that's likely because they completely stopped following the books) that I'm not sure that we'll watch anymore. So this was really kind of my last hurrah with Sookie. Well, until I read the books again in a couple of years. 

That's it for now. I'll be back in a day or two with more Smashbook pages and even (gasp!) a peek at my craft room.